
SAP Hybris Tutorial – CMS Create Custom Template | Unit 2
To create a page, we need to choose a template for the page. We can use the existed template or can create a new template for this page.
In this post, we will cover how to create a new template for the page.
Step 1: Create a new page template
Step 2: Set component slots name will be used in the template
Step 3: Link the content slots name to the existed content slot
Step 4: Create layout for the contact template
Step 5: Verify template has existed
Step 6: Create a new page using the template above
Let’s go deep dive into each step
Step 1: Create a new page template
I will create a template under the apparel-uk site, and has name Contact Page Template Test. So, Import the Impex below to create a new template.
$contentCatalog=apparel-ukContentCatalog
$contentCV=catalogVersion(CatalogVersion.catalog(Catalog.id[default=$contentCatalog]),CatalogVersion.version[default=Staged])[default=$contentCatalog:Staged]

# create the contact template
INSERT_UPDATE PageTemplate ; $contentCV[unique=true] ; uid[unique=true]   ; name                 ; frontendTemplateName    ; restrictedPageTypes(code) ; active[default=true]
                           ;                         ; ContactPageTemplate ; Contact Page Template Test ; contact/contactLayoutPage ; ContentPage
We have just created a new page template with frontendTemplateName as contact/contactLayoutPage and restrictedPageTypes as ContentPage.
There are four major types of pageType: EmailPage, ContentPage, ProductPage, and CategoryPage. We will go further about page type in the other post.
Step 2: Set component slots name will be used in the template
# Create slots for contact Template
INSERT_UPDATE ContentSlotName ; name[unique=true]      ; template(uid,$contentCV)[unique=true][default='ContactPageTemplate'] ; validComponentTypes(code) ; compTypeGroup(code)
                              ; SiteLogo               ;                                                                     ;                           ; logo
                              ; HeaderLinks            ;                                                                     ;                           ; headerlinks
                              ; SearchBox              ;                                                                     ;                           ; searchbox
                              ; MiniCart               ;                                                                     ;                           ; minicart
                              ; NavigationBar          ;                                                                     ;                           ; navigation
                              ; Footer                 ;                                                                     ;                           ; footer
                              ; TopHeaderSlot          ;                                                                     ;                           ; wide
                              ; PlaceholderContentSlot ;                                                                     ;                           ;
Every name has corresponded in one position in template page. We will map them together in step 3.
Step 3: Link the content slots name to the existed content slot.
# link slots in contact template to the correspond content slot in db
INSERT_UPDATE ContentSlotForTemplate ; $contentCV[unique=true] ; uid[unique=true]                  ; position[unique=true]  ; pageTemplate(uid,$contentCV)[unique=true][default='ContactPageTemplate'] ; contentSlot(uid,$contentCV)[unique=true] ; allowOverwrite
                                     ;                         ; SiteLogo-ContactPage               ; SiteLogo               ;                                                                         ; SiteLogoSlot                             ; true
                                     ;                         ; HeaderLinks-ContactPage            ; HeaderLinks            ;                                                                         ; HeaderLinksSlot                          ; true
                                     ;                         ; SearchBox-ContactPage              ; SearchBox              ;                                                                         ; SearchBoxSlot                            ; true
                                     ;                         ; MiniCart-ContactPage               ; MiniCart               ;                                                                         ; MiniCartSlot                             ; true
                                     ;                         ; NavigationBar-ContactPage          ; NavigationBar          ;                                                                         ; NavigationBarSlot                        ; true
                                     ;                         ; Footer-ContactPage                 ; Footer                 ;                                                                         ; FooterSlot                               ; true
                                     ;                         ; TopHeaderSlot-ContactPage          ; TopHeaderSlot          ;                                                                         ; TopHeaderSlot                            ; true
                                     ;                         ; PlaceholderContentSlot-ContactPage ; PlaceholderContentSlot ;                                                                         ; PlaceholderContentSlot                   ; true
NOTE: position fields have corresponded with contentSlotName which is defined in step 2.
In the Impex, we see the “contentSlot” field. This field is used to map to the corresponding components from OOTB (out of the box).
Step 4: Create layout for the contact template
We need to create the UI layout for the contact template. As we defined in impex in step 1, in the “frontendTemplateName” field has value: contact/contactLayoutPage.
So, let’s create contact folder under path \<storefront_project>\web\webroot\WEB-INF\views\responsive\pages\ then create contactLayoutPage.jsp file. Then paste the content by following snipet code:
<%@ page trimDirectiveWhitespaces="true" %>
<%@ taglib prefix="template" tagdir="/WEB-INF/tags/responsive/template" %>
<%@ taglib prefix="spring" uri="http://www.springframework.org/tags" %>
<%@ taglib prefix="cms" uri="http://hybris.com/tld/cmstags"%>
<spring:htmlEscape defaultHtmlEscape="true" />
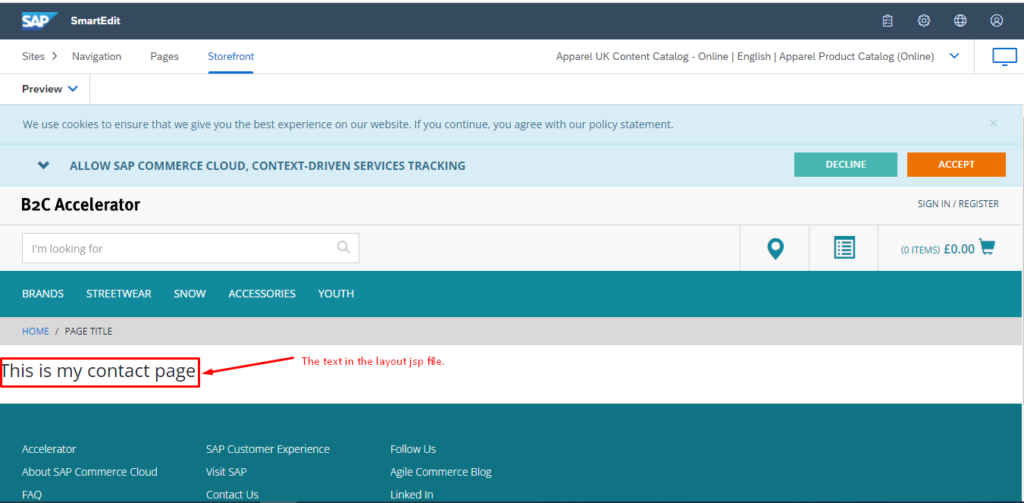
<template:page pageTitle="${pageTitle}">
<h3>This is my contact page</h3>
</template:page>
Step 5: Verify template has existed
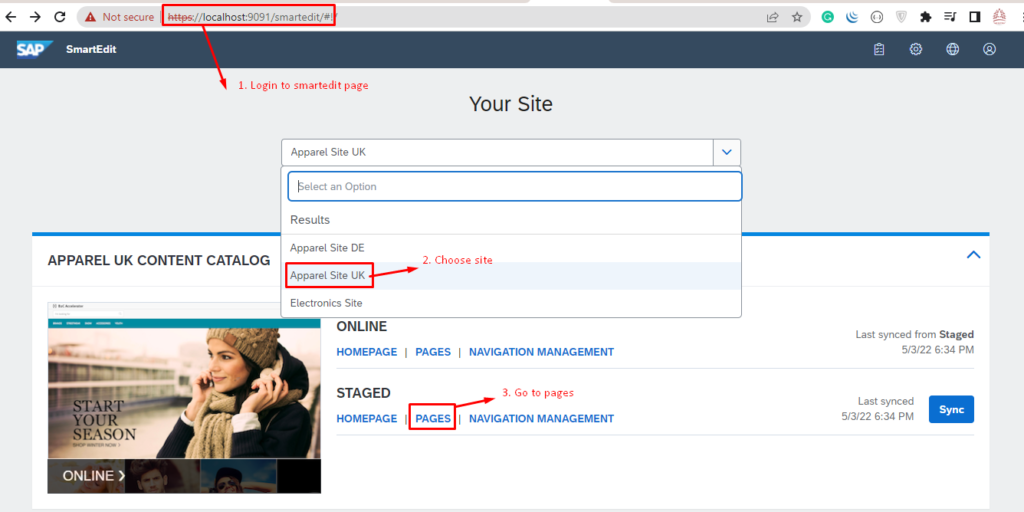
After running 3 impexs from step 1, step 2, and step 3 in HAC. We can verify our template whether existed by smartedit.
1. Loggin to smartedit at https://localhost:<yourport>/smartedit then choose your site then go to pages of the staged mode.
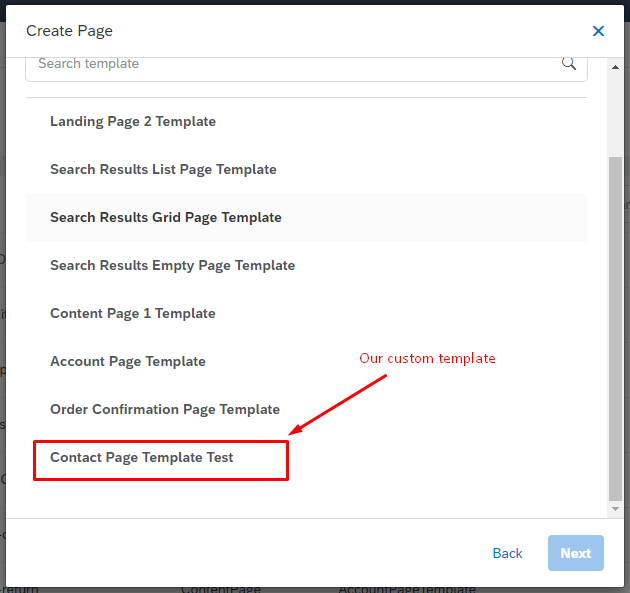
2. Create the new page with type is “content page” then press on next button. In this step, you will see our custom template with name Contact Page Template Test
Now, let’s move on in the next step to create the page by using our template.
Step 6: Create a new page using the template above
There are 2 ways to create the page. First creating a page in smartedit, second by running Impex script.
First: Create a page in smartedit.

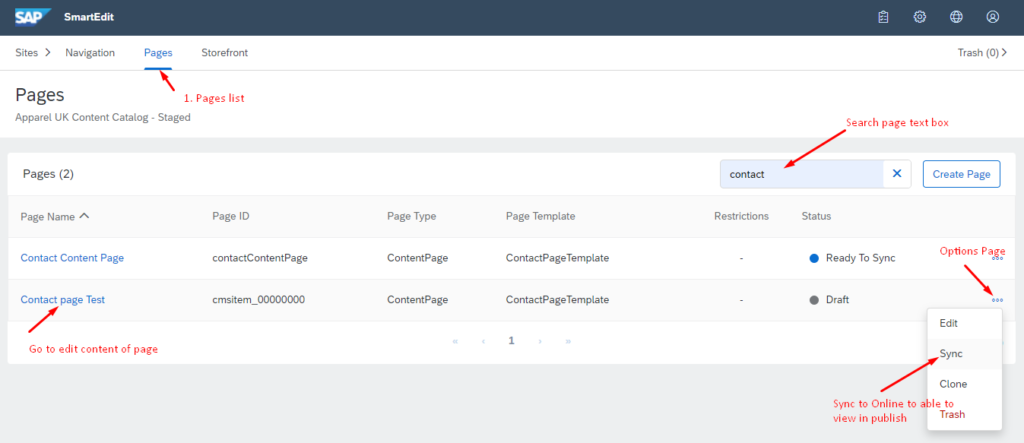
- We continue from step 5 by clicking on the Next button and fill your information for your page.
- Click done
- In the list page, search by your page name: Contact page Test
- Click on the page to go to edit content of page.
Second: running Impex script.
In HAC, run the following impex:
# create contact page from template just created
INSERT_UPDATE ContentPage ; $contentCV[unique=true] ; uid[unique=true]  ; name                ; masterTemplate(uid,$contentCV) ; label ; defaultPage[default='true'] ; approvalStatus(code)[default='approved'] ; homepage[default='false']
                          ;                         ; contactContentPage ; Contact Content Page ; ContactPageTemplate             ; contactCMSPage
The we can go to the smartedit to verify the new page with name: “Contact Content Page“
Congratulation! your template is created. We are using all components from OOTB to include into our template. To create new component and use it in the template. We will move to the next post: Creating Custom Component
Happy coding.!!! <3